This is a Dragonflight Solo Shuffle guide 10.1/10.0.7 from melee DPS where we're going to be showing you some things you need to start doing immediately in Solo Shuffle. We will cover a wide range of topics with everything designed to directly improve your rating no matter where you're starting from.
WoW Dragonflight Solo Shuffle Guide 10.1/10.0.7 - Best Tips for Melee DPS in Solo Shuffle PVP
In World of Warcraft, the Dragonflight Solo Shuffle is a method of farming gold and loot by soloing the raids of the Cataclysm expansion. If you're playing a PVP melee DPS class in the Dragonflight Solo Shuffle 10.0.7/10.1, here are some best tips to improve in Solo Shuffle.
1. Addons
The first solo shuffle tip for melee DPS in Dragonflight 10.0.7/10.1 is making good use of add-ons, which allow you to make the best decisions. We'll recommend you play with two very key add-ons especially as a melee, Omnibar and Omnicd. In the case of Omnibar, you should periodically check on all the enemies defensives and use that information in your decision making to select targets and spot win conditions. Remember, a slightly tank class with no defensives is always a better kill target than a squishier class with all their cooldowns. For Omnicd, we recommend to track your teammates defensives and taking those in consideration before deciding to push in and play aggressive, great thing especially when we think of solo shuffle since there's no communication, and that brings us to our next question how do you know when to push in and when to pull back.
2. When to Push
There's actually a correct answer to that question and is something we need to have in consideration at all times. Checking Omnicd is just one step we need to take, but we need to do more. To start off, let's make clear when it's a good time to push in, and the most straightforward answer is to do so when you have defensives to trade. If you have your main defensive CD and a PVP trinket ready, you're always pretty safe. Here is where Omnicd recommendation comes into play as this doesn't only apply for your personal cooldowns. There might be situations where you're completely out of defensives, but your healer still has a lot of CDs to trade and those situations are still good times to push. Do keep in mind that being a melee means that you sometimes have to use defensives in order to stay aggressive and deal damage. So trading them effectively also translates to more overall pressure and damage dealt. Ideally, you're using your defensives to stay in the fight instead of pulling out.
On the flip side, there are bad times to push though. We first need to have in mind that some burst or setup base specs like Frost Death Knight or Subtlety Rogue don't have to be pushed in a 100% of the time since they rely more on bursty setups instead of consistent damage. For those specs, sometimes it's the best play to hug a pillar and only ever play during your CCS or your burst. Nonetheless, some situations also demand you to stay back in line of sight the enemies such as when your healers under crowd control or to respect a strong ranged burst or the most common situation which is when your team is out of defensives. Pulling back and hugging a pillar until your cooldowns back can be the game winning move.
3. Don't Take Damage Without Dealing Damage
When you are in, never stop doing damage. You'd be surprised to see how this doesn't happen in practice. Think how many times have you been in a situation where you're trying to kill a Hunter or a Mage and all they're doing is running away and kiting to Narnia. So you're stuck there, waddling in the center of the map, doing a whopping 0 DPS, feels like you aren't impacting the game at all. It’s not meaning that you shouldn't ever chase your enemies here especially if you're close to a kill, instead, while chasing, you want to be maximizing your damage by tab targeting whoever you can along the way. Fortunately though, there is an easy fix. While waddling around and chasing your kill, never stop doing damage, everything matters. You could be killing totems on your way, hitting the enemy patter on the ideal scenario hitting a player while you're on your way to your actual target. Anything that demands healing or takes away utility from the enemy team or at the very minimum help you generate resources can be the difference between you winning the game or not. If you're only tunnel visioning one target all game, you're nerfing your own DPS. And as we all know, damage is King in Solo Shuffle, but even in moments where you feel like you can't connect to your target, there is usually something you can hit.
4. Target Selection
The next melee tip for solo shuffle in Dragonflight 10.1/10.0.7, and probably the most common issue we see all around is target selection. Most Solo Shuffle games start like this, pick the squishiest target and train them the whole time. This is where you run into some issues even though this seems like the right thing to do. Although we highly recommend having an initial target that's easy to kill or that gives you the most uptime, being flexible and willing to swap to the right targets mid game is key to climbing raiding as a melee.
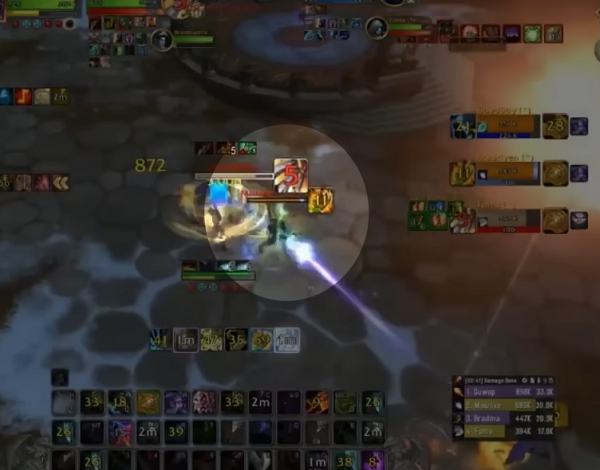
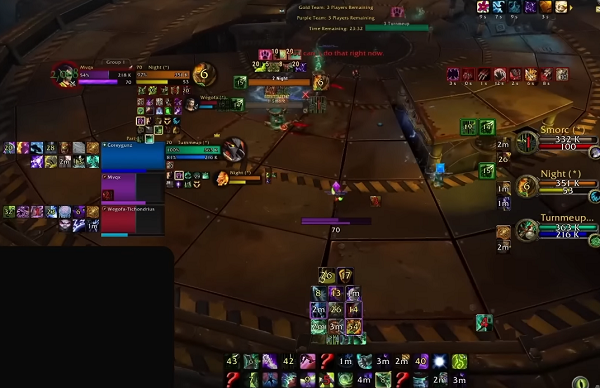
Take this clip for example, following a 1.9 K Sub Rogue who got lucky and is playing with a Mage. They opt for the enemy Arms Warrior but pay attention on how the enemy boomkin starts to play overly aggressive, positioning himself on top of their team even using a bark skin for no reason which should be a green light to swap targets. Even though the Warrior was the plan in the starting room, the Druid is now the juiciest target. This is why we stress monitoring omnibar to check on defensive cooldowns as a Melee, because it instantly tells you who's the most vulnerable, it's not anything complicated and it really doesn't require super in-depth game knowledge. If someone had has no defensives left and are in a vulnerable position, you should be willing to deviate from your initial plan. This goes hand in hand with our suggestion to maximize damage by doing drive-by attacks on targets while you're getting kited. Sometimes you have to just accept the fact that you can't connect to someone and that's totally fine if it means you can recognize a new target to start cleaving. Now this even includes being willing to swap healers, because damage is so high, healers will often have to burn all of their defensive super fast in the first minute of the game. This is especially true if the enemy team is a melee cleave. If you see the enemy healer has no defensives left, they can be a fantastic target. At worst you won't kill them, but at best it means you now have the ability to cleave down multiple targets if the DPS decide to stack.
5. Goal Keep Your Healer
Speaking of healers, there is a tip that every melee should know and adapt in their game plan and that's to sometimes play goalkeeper for your healer. By now you probably heard the phrase hit the closest wizard on a stream or found this out yourself. In those match-ups against double caster, your options can feel limited. But sometimes the best thing you can do is just hit whatever caster is closer to your team's pillar. It's no wonder that this strategy became popular due to its effectiveness and the main idea behind it is protecting your healer. The main issue when playing against double caster is that they can easily bay you across the map which leaves you stranded in nowhere while your healer needs to role play Jason Bourne to cross the arena. Instead, by always swapping targets and hitting whoever pushes forward and is closest to your healer, you're able to keep a really solid formation, making it really hard for the enemy to land CC. This game plan of playing goalkeeper usually gives an edge for the melee team, since you'll be able to out pressure the enemy team and have a higher chance at winning the defensive battle either by ooming the enemy healer or killing through raw damage when dampening ramps higher.
6. Don't Waste Your Mobility
In any PVP meta, being able to have good uptime on your target has always been key. However, while PVP keeps becoming closer and closer to a PVE war of whoever can do more damage and put the enemy team through endless pressure, having a mobility advantage is even more crucial than ever before. Sometimes it can become overwhelming keeping up with all the shimmer charges, ports, gateways and rescues that the enemies have to work with. It's at the point where it feels like one misuse of a mobility spell, turns you into a walking dummy waiting 30 seconds for your next gap closer while getting owned, or even worse. Having that sore feeling when you press all your burst on someone just to be completely guided and denied because he did so while your mobility was still on cooldown.
Bonus Tips & Melee DPS Tips for Solo Shuffle
Here are some extra Solo Shuffle tips to help you maximize your damage output and complete the raid more efficiently:
Use the Right Talents and Glyphs: Make sure you have the right talents and glyphs selected for your class and spec. Some talents and glyphs may be better suited for soloing, while others may be more effective in group content.
Use Defensive Cooldowns: Dragon Soul and Firelands are difficult raids, even for well-geared characters. Use your defensive cooldowns wisely to survive boss mechanics and avoid taking unnecessary damage.
Optimize Your Gear: Make sure you have the best possible gear for your character, including weapons, trinkets, and other equipment. Use gems, enchants, and other enhancements to optimize your gear for maximum damage output.
Use Crowd Control: Some bosses have adds that can be difficult to manage, particularly for melee DPS. Use crowd control abilities such as stuns, silences, and interrupts to control the adds and prevent them from causing problems.
Pay Attention to Boss Mechanics: Each boss in Dragon Soul and Firelands has unique mechanics that require different strategies to overcome. Pay attention to these mechanics and adjust your tactics accordingly.
Use Movement Abilities: Some boss mechanics require players to move quickly or avoid certain areas of the fight. Use movement abilities such as charges, rolls, and dashes to move around the fight quickly and avoid taking unnecessary damage.
Experiment with Different Specs: If you're having difficulty soloing a particular boss, try experimenting with different specs or talent builds. Some specs may be better suited for soloing than others, so don't be afraid to experiment.
By following these tips, you can improve your performance and complete the Dragonflight Solo Shuffle 10.1/10.0.7 more efficiently as a melee DPS character in World of Warcraft.