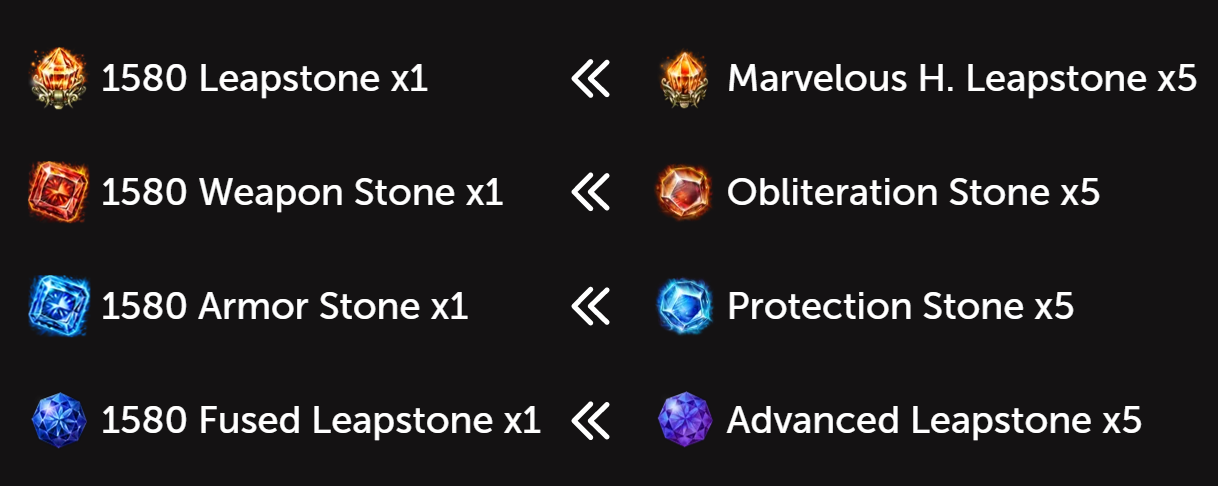
Elixirs are a new way to further increase your character power. They’re an item that you “cut” (similar to stones) to gain effects/stats (similar to bracelets). Their intent is to be a gold sink, similar to both the previous mentions. Different to both Stones and Bracelets you’re sort-of in control of your RNG to a certain degree, since you pick the effects you want to upgrade from a relatively small pool. Even relatively “bad” Elixirs can be useful for unlocking their set effects, so they’re not entirely “useless” if you get a bad roll. And since you need multiple of them (one for each armor piece), “incorrect” rolls can still be useful for upgrading your currently equipped ones.
How Do You Obtain Them?
“Elixir of Wisdom” and a new material used to craft them called “Spirit of Wisdom” come from Voldlike’s Abyss Dungeon, Ivory Tower.
There are 2 rarities of Elixir:
-Elixir of Clear Wisdom which comes from Normal Ivory Tower (1600 ilvl)
-Elixir of Radiant Wisdom which comes from Hard Ivory Tower (1620 ilvl)
The same applies for Wisdom Spirits.
You can also dismantle elixirs for fragments (similar to Ability Stones or Bracelets). You can then use these fragments to craft new elixirs. These fragments are tradeable, meaning you can buy them from the Auction House.
-Ivory Tower (Gates 1 to 4)
Difficulty: Normal (1600)
Reward: 8 Clear Spirit of Wisdom
Bonus Chest: 8 Clear Spirit of Wisdom
Auction (G2, G4): 2x Elixir of Clear Wisdom (one per auction)
Difficulty: Hard (1620)
Reward: 8 Radiant Spirit of Wisdom
Bonus Chest: 8 Radiant Spirit of Wisdom
Auction (G2, G4): 2x Elixir of Clear Wisdom (one per auction)
-Crafting
Rarity: Elixir of Clear Wisdom
Requires: 4x Clear Spirit of Wisdom or 65x Elixir of Clear Wisdom Fragment
Cost: 100 Gold
Rarity: Elixir of Radiant Wisdom
Requires: 4x Radiant Spirit of Wisdom or 75x Elixir of Radiant Wisdom Fragment.
Cost: 250 Lost Ark Gold
How Do They Work?
You start with an empty elixir and go to the 3 Sages. Each Sage will give you a choice. Each choice represents some Effect that can be Armor-specific bonuses, Base Stats (Defense, Dexterity, etc) or Elixir “Sets”.
-An “empty” elixir has 5 slots.
-The 3 “Sages” will give you several choices.
-You fill each slot with the effects you pick.
-You can also reroll the choices given by Sages up to 2 times at any point during tapping for no cost.
Elixir Effects
Each selected effect will have 10 “nodes” (9 in the case of Epic elixirs) that you need to fill to gain different levels of the bonus. As you can see in the picture below:
-Level 1 requires 3 nodes
-Level 2 requires 6 nodes
-Level 3 requires 8 nodes
-Level 4 requires 9 nodes
-Level 5 requires 10 nodes
The effects that you can pick are divided into 6 “types”: General, Helmet, Gloves, Shoulder, Chest, Pants. The armor-specific ones only work if they’re equipped in the correct armor slot (eg: a “Helmet” effect won’t work if it's equipped in your Gloves)
The list of effects for each piece are:
General
Stat
Attack Power
Mana
Weapon Power
Stagger
Battle Item CDR
Primary Stat (Dex/Int/Str)
Damage when Solo
Combat Resource Recovery
Stand Up CDR
Battle Item damage
Spacebar CDR
HP Recovery
Helmet
Note: There’s 6 different DPS sets and 3 different Support sets. They have the same Stats but different set effects.
Stat
Damage % + Defense + Magic Defense
ATK Buff effectiveness + HP
Set Effect
Damage Reduction + Damage Increase
Crit Chance
Damage Increase
Shield over time + Damage Increase
Skill CD reduction chance
Crit Damage
Buff Effectiveness + CD Reduction
Buff Effectiveness + Identity Gain
Buff Effectiveness + Weapon Damage
Gloves
Note: There’s 6 different DPS sets and 3 different Support sets. They have the same Stats but different set effects.
Stat
Damage % + Defense + Magic Defense
ATK Buff effectiveness + HP
Damage Reduction + Damage Increase
Crit Chance
Damage Increase
Shield over time + Damage Increase
Skill CD reduction chance
Crit Damage
Buff Effectiveness + CD Reduction
Buff Effectiveness + Identity Gain
Buff Effectiveness + Weapon Damage
Chest
Stat
Magical Defense
Physical Defense
Damage Reduction
HP
Pants
Stat
ATK Buff effectiveness
Identity Gain
Additional Damage
Crit Damage
Shoulders
Stat
Awakening Damage
Boss Damage
Shield Effectiveness
Healing Effectiveness
Tapping
After picking your 5 effects, you have 14 “taps” (11 for Epic elixirs) that you can use to increase/decrease/lock the effects you’ve picked. Each tap costs 5 Soft Catalyst and 280 gold (2 Catalyst and 120 Gold for Epic) .
Each tap lets you pick one of the 3 sages, and each sage will provide different choices. There’s a lot of choices. You basically have an equal chance to increase any of the nodes (20% per category), but there’s sage choices that let you pick a specific effect, or to block another, or to gamble nodes, etc. This affects the chances of the remaining/other effects.
Each tap also has a “great success” chance to increase the nodes by twice as much.
Enhancement
The more you pick (or not) a specific Sage, the “better” the choice will be. There’s essentially 2 types of enhancements: Order and Chaos.
Order choices are usually “good”; they’re low risk low reward type of picks.
Chaos choices are often “gamble” or “evil” choices; for example: +4 to a specific effect but the Sage leaves, leaving you with only 2 Sages to pick from.
Order stacks increase when you choose them and decrease when you don’t.
Chaos stacks increase when you don’t pick them, and decrease when you do.
If they reach max stacks, they offer bigger/better choices.
Equipped Elixir “Points”
Once you finish your elixir and you equip it to any armor piece, it will provide “Elixir Points” which are the sum of “effect levels” the elixir has. For example, an Elixir with one Lv5 Effect and one Lv2 Effect will count as 7 Elixir Points. You can also save up to 3 different elixirs to the same armor piece (only the selected one provides any bonus and elixir points). Bear in mind that you can’t take an elixir out of the armor piece. You can only overwrite them.
“Cutting” Strategy
Since “General” effects are less impactful than Armor-specific effects, you usually want to get Armor effects to Level 5 and General effects to whatever RNG decides to give you. Since you need to have 35 “Elixir Points” to unlock the Set Effect Lv.1 (or 40 for Lv.2), you usually want 7 (8) Points per elixir (eg: Lv5 Armor effect + Lv2 General effect) for each piece.
Even if you don’t meet the Elixir Points required for set effects, you still get all the passive stats from cutting and it’s still a good bit of damage per piece.
Tips
Chest Effects only provide defensive bonuses (HP/Defense/Damage Reduction), you can pick 2 “General” effects instead for more damage. You can reroll whatever choices are given to you up to 2 times. There’s one “Chaos” max-stacks effect that allows you to reset the elixir (starting again to pick effects). This can be helpful if your elixir is going wrong, and saving rerolls for that point is a good strategy.