We've put together a list of what we consider to be the best and worst dungeons available for nightmare dungeon farming for more D4 gold.
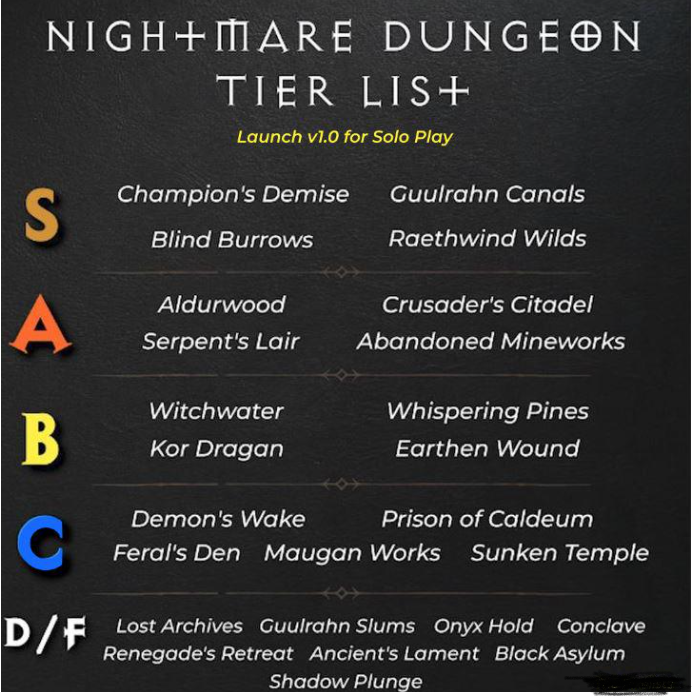
Diablo 4 Nightmare Dungeon Tier List for Solo Play
First, we evaluated this based entirely on solo play. People who play in groups may view these maps slightly differently. Second, we evaluated maps primarily with: Density of the map, Map layout, Presence of an Intermission, and Mob types. Also that we balanced the ability to XP farm with loot drops meaning that a map needed to be relatively easy to farm with great density and a simple layout. If your goal is rushing to completion for Glyph progress, some of these rankings will change. Lastly, all maps were run around level 50 nightmare tier, give or take a few levels.
S Tier
Always worth running.
S Tier - Champion's Demise (Demon Slaying): Very simple layout with amazing density. Lots of elite packs and 1-2 shrines to help along the way. Note the shamans can offscreen 1-shot you at high sigil levels (60+).
S Tier - Guulrahn Canals (Undead Slaying or Beast Slaying): Another map with incredible density. The exit will always be towards the top -- 1st half is slain all enemies which we love + it's basically a big circle. 2nd half is a little smaller but great density persists. Extremely easy map though beware of poison damage at high sigils.
S Tier - Blind Burrows (Beast Slaying): This map has only 1 objective + a boss. The objective is to kill 3 guards. Density is incredible which we can always expect when spiders are involved. The layout is simple -- just a large circle so be sure to peak into off-shoot paths as each one holds a guard.
S Tier - Raethwind Wilds (Beast Slaying): 1st half is completely linear + Kill all enemies. 2nd half has you kill 3 guards -- this has the potential for awful backtracking as the path to the boss is a long one. Just remember that the boss is always up so start from the bottom and you'll clear it quickly. Incredibly density + tons of elite packs.
A Tier
Usually worth running, with some small annoyances
A Tier - Aldurwood (Beast Slaying): A great S-tier contester, there's not as much density as the previous S-tier maps but the map more than makes up for it with tons of elite packs. 1st section is a Figure-8 so no backtracking is needed, + each guard you are killing usually has elites around it. 2nd section takes you straight to the boss with some elites on the way.
A Tier - Crusader's Citadel (Man Slaying): Definitely a map we wanted to be S-tier simply due to the fact that we haven't seen another map with this size of elite density. The elite packs here are massive -- with tons of extra mobs. You'll be surprised how much loot drops, though these packs get very deadly at high-level sigils. The map loses a little due to the fact there is an Intermission (remember, no XP and no loot here) + a boss that can be a little annoying. 1st section is a linear path and 2nd section can be a bit clunkier. Remember, clear from the bottom then move up.
A Tier - Serpent's Lair (Beast Slaying): Lots of cultists and spiders here in addition to snakes. The map has two great objectives -- collect Animus and then kill Eyes (constructs). The eyes will always spawn an elite with extra mobs and while some Animus objectives involve an elite by their lonesome, this map fortunately has Animus guards with lots of company. The layout is very easy -- basically a circle -- so make sure you are checking the off-paths for those animus guards. One small detail to note, this map is a bit farther from a waypoint, so it may be better to run multiple in succession.
A Tier - Abandoned Mineworks (Undead Slaying): This map has the pesky rescue Prisoners' objective, which means stopping and having to channel with no mobs near. Despite this, it's an extremely straightforward layout and the density is terrific. The 2nd half has you kill 3 Guards, and a fair warning here, there is some nasty potential for backtracking which places it in the low A category (maybe a high B). If you run the map enough you'll learn where you can avoid this though and can enjoy running the map
B Tier
A decent map, though there are some noticeable drawbacks.
B Tier - Witchwater (Beast Slaying): It's a straightforward map with decent density. We do have the rescue prisoners objective with the 2nd half asking us to destroy Eyes, and there's a Spider boss. It didn't seem to have quite the elite density we had seen in higher maps which puts the map a little lower on our tier list.
B Tier - Whispering Pines (Beast or Demon Slaying for Boss): This is another contender for a low-A tier map. The first half involves killing 3 guards with the 2nd half asking you to kill all enemies. There is unfortunately an intermission, on top of the presence of a boss. It's a good map with not quite as many elite packs as we can find in the higher tiered maps.
B Tier - Earthen Wound (Man Slaying): This map has a terrific 1st half layout that is completely linear, asking you to destroy gates that always spawn an elite pack. The 2nd half has you collect animus, and this 2nd half involves a much larger map that ends with a boss. The pure size of this 2nd half is what knocks this map squarely down into the low B-tier. The density is decent, but the size of the map doesn't pay off for the time you'll be here.
B Tier - Kor Dragan Barracks (Undead Slaying): A map with lots of vampires, this one involves hitting 2 cranes to open a door, followed by destroying several Blood Boils in the 2nd half. I think in general this is a decent map -- the density feels good as you look for blood boils and this half also seems to have lots of elites. Unfortunately it also has the same problem as Earthen Wound -- the map is huge and if you don't know it, you will find yourself backtracking quite a bit. Still, it's not a bad map by any means which puts it in our B category.
C Tier
There are too many drawbacks to running these consistently, but you're welcome to run them if you have them.
C Tier - Demon's Wake (Demon Slaying): Our first map in the C tier category has a 1st half that asks you to kill 2 Idols. While these spawn elites on death, the density around them is atrocious. The 2nd half of the map will ask you to kill all enemies -- an objective we love -- but this is really the only place that density picks up. Besides this, the layout isn't great and can be a bit difficult to navigate. The 2nd half saves the map a bit, but in general, we place this high in the C category.
C Tier - Prison of Caldeum (Man Slaying): The first half is the Kill 3 Guards objective, with the 2nd half asking you to Collect Animus. While the density is good at moments, the layout is fairly terrible. On top of this, there is the presence of an Intermission (No XP, no loot) as well as a boss. With some bright spots in density, you could argue this map could go in the B tier -- but more often than not we found ourselves annoyed with the map each time we ran it.
C Tier - Feral's Den (Beast Slaying): The one map that squeezed itself into the C tier instead of the D tier because of one word -- SPIDERS. There are lots of 'em... if you get lucky and your dungeon spawns with enough of them. Otherwise, you'll be frustrated by the lack of density. The 2nd half asks you to do a unique objective -- active 2 runestones. Unfortunately, these don't spawn elites, and the layout in general is not straightforward. All this + a boss puts the map squarely in the C tier for us.
C Tier - Maugan Works (Man Slaying): The 1st half will ask you to Rescue Prisoners -- an objective we don't really like -- with the 2nd half going straight to the Boss. There are Penitant here -- which typically spawn higher than normal elite-sized packs. These packs make the map "just okay". Not to mention there is an Intermission here (no XP, no loot) so we place this in a fairly lower ranking.
C Tier - Sunken Ruins (Undead Slaying): In the first half you're going to be retrieving stone idols with the 2nd half asking you to kill all enemies. The 1st half doesn't have great density but the 2nd half seems to do much better here. It's a clunky layout in a largely forgettable map -- but if you run it enough and learn the layout enough, we can definitely see this going up into the B category, or even higher if you play this map with a group.
C Tier - Shivta Ruins (Demon Slaying): The 1st half is the ugliest part of the map, asking you to collect bloodstones with a fairly large map that is easy to get lost in. There isn't great density, and before you move on to the final section with the boss, you will have to go through an intermission. It's a pretty average C-tier map.