Diablo 2 Resurrected 3.0, with the Region of the Warlock (ROTW) expansion and Season 13, has added new layers to endgame farming. Heralds of Terror, Worldstone Shards, Latent Sunder Charms, and Statues now sit alongside the classic boss runs and high-rune zones that have defined D2R farming for over two decades. This guide covers every worthwhile farming spot in the game, ranked from strongest to weakest, and then lays out ready-made farming routes you can follow based on your build, your gear level, and whether you play solo or in a group. Monster levels, item levels, Terror Zone mechanics, and the new Herald tier system all factor into where you should spend your time, and each section below explains exactly what you can expect to find and how to do it efficiently.
D2R 3.0 Best Farming Spots in Region of the Warlock & Season 13
| Farming Spot | Rank | Items to Farm | Spot Features | Best for Which Builds |
|---|---|---|---|---|
| Chaos Sanctuary Act 4 | 1 | High Runes Uniques Sets Bases Statues | Level 85 area · Highest combined value (boss + zone) · Diablo + 3 Seal bosses · Very high elite density · Terrorized version drops Statues and spawns Heralds | All builds with strong AoE and survivability. Hammerdin, Lightning Sorc, Fire Sorc, Trapsin, Summon Necro all excel here. |
| Cow Level Act 1 (Portal) | 2 | High Runes Bases Gems Charms | Highest mob density in the game · Best raw volume of rune drop rolls · Top source for socketed bases (Monarchs, Archon Plates) · Requires Wirt's Leg + Tome of Town Portal in Cube | AoE-only builds: Javazon (Lightning Fury), Lightning/Fire Sorc, Trapsin, Summon Necro. Avoid with single-target builds |
| Terrorized Act Bosses Any Act | 3 | Uniques Sets Statues | Boosted monster levels allow any item to drop · Statues only drop from terrorized bosses · Rotates every 30 min · Time-limited window — speed matters | All builds capable of killing act bosses quickly. Teleport strongly preferred for reaching bosses fast during the rotation window. |
| Terror Zones (Herald Farming) Rotating | 4 | Latent Sunder Charms Uniques Sets Runes | Heralds are the only source of Latent Sunder Charms · 2% Herald spawn chance per elite kill · Herald tier 1→5 system (higher tier = better loot) · Use Worldstone Shards after building tier · Monsters get +2/+4/+5 level boost | Fast teleport builds with high damage output and strong defenses. Tier 5 Heralds hit very hard. Build Herald tier before using Worldstone Shards |
| Mephisto Act 3 | 5 | Uniques Sets | Top 3 loot value per run among act bosses · Fast run with teleport · Farmable in Nightmare as stepping stone · Durance Level 2 layout can be confusing | All builds, especially Sorceress with Teleport. Any class with Enigma works well. Aim for 400–500 MF. |
| Duriel + Summoner Act 2 | 6 | Uniques Sets | Two bosses in one run · Top 3 loot value · Missing tomb symbol trick to find correct tomb instantly · Arcane Sanctuary has 4 branching paths | Teleport builds strongly recommended due to the Arcane Sanctuary's sprawling layout. Sorc or Enigma users. |
| Travincal Council Act 3 | 7 | Runes Gold Uniques Sets Charms | Guaranteed large gold drops · Very strong rune drop rate · Council members use Hydra and Blizzard — dangerous early season · Direct waypoint access | All builds with enough survivability. Hammerdin, Smiter, Fire/Lightning Sorc. Gold from this run fuels gambling for skill amulets. |
| The Pit Act 1 | 8 | High Runes Uniques Sets Bases | Level 85 area · Two floors · Relatively easy monsters · Champions (87) and bosses (88) can drop nearly anything · 50/50 chance on cave entrance | All builds. Particularly strong for Item Find Barbarian ("horking" with Find Item for double loot rolls on corpses). |
| Ancient Tunnels Act 2 | 9 | High Runes Uniques Sets Bases | Level 85 area · Zero Cold-immune monsters · Hidden trapdoor entrance in Lost City · Single floor full clear | Best level 85 zone for Cold Sorceress (Blizzard, Frozen Orb). Also works for any other build. No Cold immunes |
| Pindleskin Act 5 | 10 | Uniques Sets XP | Ultra-fast run (under 30 sec) · High monster level · Portal next to Anya · No navigation needed · Skeletons around him also drop well | All builds. No teleport required. Stack as much MF as possible — speed makes small % increases add up over hundreds of runs. |
| Nihlathak Act 5 | 11 | Uniques Sets High Runes Bases | Level 95 · Same drop table as Baal · Red corridor markers reveal his location · Wall direction trick for navigation · Uses Corpse Explosion — very deadly | Builds with high fire resistance and life pool. Teleport helps with navigation. Dangerous — Corpse Explosion can one-shot |
| Mausoleum Act 1 | 12 | Uniques Sets Bases | Level 85 area · Easiest monsters of any L85 zone · Two separate crypts to clear · Burial Grounds near Cold Plains waypoint | All builds, especially undergeared characters freshly arrived in Hell. Safest L85 farming option in the game. |
| Act 3 Temples & Sewers Act 3 | 13 | High Runes Uniques Sets Bases | Multiple high-level zones clustered together · Two temples between Kurast and Travincal have fixed locations · Sewers accessible from Upper Kurast · Good for extended sessions | All builds. Fire and Lightning builds work well since Sewers have no Fire immunes. Chain temples + sewers + Travincal in one loop. |
| Countess Act 1 | 14 | Runes (to Gul/Lo) | Guaranteed rune drops every kill · Best source for mid-tier runes (Hel–Ist) · 5-level tower descent · Weak for uniques/sets · Gul/Lo require hundreds of runs | All builds except Cold Sorceress (Countess is Cold-immune). Fire builds clear her fastest. Cold immune boss |
| Eldritch & Shenk Act 5 | 15 | Uniques Runes Bases XP | Two super uniques from one waypoint · Extra champion/elite packs nearby · Shenk's minions die when he dies · No teleport needed · Fast run | All builds. Great for beginners and non-Teleport characters. Check alcoves around Shenk for bonus elite density. |
| Andariel Act 1 | 16 | Uniques Sets SoJ (NM) | Short boss run · Best Stone of Jordan source in Nightmare · Solid but not top-tier in Hell · Catacombs Level 2 waypoint start | All builds. Works best as part of a larger route or split farm rather than standalone. Teleport speeds up the Catacomb descent. |
| Baal Act 5 | 17 | Uniques Sets XP | Best drop table among all bosses · Mandatory 5-wave clear makes run very long · Top experience source for leveling · Worldstone Keep Level 2 waypoint start | All builds with high survivability. Better as part of multiplayer split farms than solo. Long run — poor loot/minute solo |
| Act 5 Red Portals Act 5 | 18 | Runes Uniques Bases | Sub-zones in Glacial Trail, Frozen Tundra, Arreat Plateau · Less efficient than Act 1–3 zones · Much better when terrorized · Worth checking during Terror Zone rotations | All builds. Lower priority unless the area is terrorized. Farm only when terrorized for best value |
Below, we will break down each farming location in detail:
1. Chaos Sanctuary (Act 4)
The Chaos Sanctuary is located at the end of the River of Flame in Act 4. It is a level 85 area, which means champion packs inside are level 87 and unique boss packs are level 88. That monster level range allows every item in the game to drop here, including the rarest uniques and set pieces. On top of that, Diablo himself waits at the center once you open all three Seals, making this the only spot in the game where you get a top-tier act boss and a level 85 zone packed with elite density in the same run.
What to farm: High runes from the dense mob packs, unique and set items from both the elites and Diablo, base items for runewords, and when the Sanctuary is terrorized, Statues from Diablo and potential Herald of Terror spawns from the elite kills. In testing across hundreds of runs on a 500 Magic Find Sorceress, Diablo ranked as the single most valuable boss to kill in terms of equivalent loot return.
How to farm: There are two routes. The fast method is to teleport straight to each Seal, pop the Seal, kill the Seal boss, and then kill Diablo. This is the go-to once your character is strong enough to handle the Seal guardians without risk. The slower but safer method is to clear the entire Sanctuary floor, killing every pack along the way before opening the Seals. Early in a season or when your gear is still coming together, the full-clear approach is less risky and still gives you a shot at high runes from every pack you kill. A hybrid method, clearing the middle section while skipping the edges, then doing the Seals, works well as a middle ground.
2. Cow Level
The Cow Level is accessed by combining Wirt's Leg (picked up in Tristram via the Stony Field portal) with a Tome of Town Portal inside the Horadric Cube while standing in the Act 1 Rogue Encampment. It has the highest mob density of any area in the game, bar none.
What to farm: High runes are the main draw. Because every cow is a normal monster that drops from the same table and there are hundreds of them per run, your raw volume of rolls on the rune drop table is enormous. Base items for runewords also drop frequently — socketed Monarchs, Archon Plates, and similar endgame bases. Gems, jewels, and charms fill out the rest.
How to farm: This zone heavily favors builds with large area-of-effect damage. Javazon (Lightning Fury), Fire or Lightning Sorceress, Trapsin, and Summon Necromancer all perform well. Builds without AoE like a Smiter, should avoid this area entirely because single-target damage turns a fast run into a slog. Herd the cows into large groups, blast them down, and move to the next cluster. The entire level should be cleared in one pass.
3. Terrorized Act Bosses
With the ROTW expansion, whenever a Terror Zone covers an area that contains an act boss — Andariel, Duriel, Mephisto, Diablo, or Baal — that boss becomes terrorized. Terrorized act bosses gain boosted monster levels, which means they can drop every unique and set item in the game regardless of which act they belong to. They can also drop the new Statues introduced in ROTW.
What to farm: Any unique or set item in the game, plus Statues. A terrorized Andariel or Mephisto effectively becomes as good as a terrorized Diablo in terms of drop potential, which is a massive upgrade over their normal loot tables.
How to farm: Whenever you see a Terror Zone that includes an act boss, prioritize farming that boss above anything else. This is a limited window, Terror Zones rotate every 30 minutes in ROTW, so speed matters. Teleport to the boss, kill it, reset, and repeat for as long as the Terror Zone is active on that area.
4. Terror Zones - Herald of Terror Farming
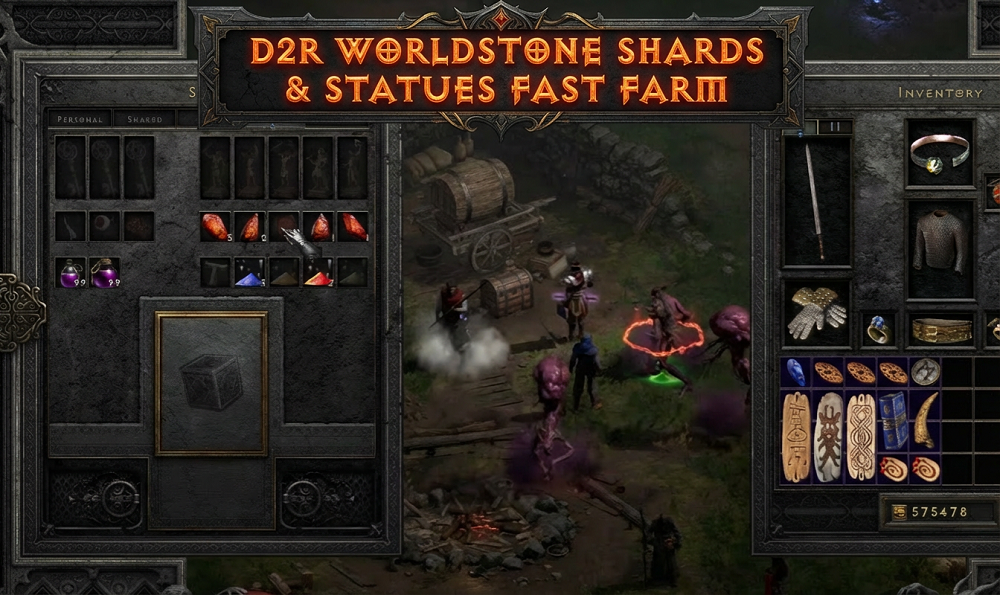
Terror Zones are rotating areas where all monsters receive a level boost: base monsters get +2 levels, champions get +4, and unique bosses get +5. In ROTW, these zones are also the only place where Heralds of Terror can appear. Heralds are the sole source of the new Latent Sunder Charms, which are far superior to the previous Sunder Charms and carry extremely high trade value in Season 13.
What to farm: Latent Sunder Charms from Heralds, plus all the regular drops you would expect from a high-level zone - uniques, sets, runes, and bases. Each Herald you kill increases the tier of the next Herald you encounter, up to a maximum of tier 5. Higher tiers mean better loot from the Herald itself.
How to farm: Kill champions, elite packs, super uniques, and bosses inside the active Terror Zone. Each of these kills has roughly a 2% chance to "draw the eye" of a Herald, which triggers a message that a Herald is hunting you in that zone. You then continue clearing until you find the Herald — identifiable by a purple ring above its head. Once you kill a tier 1 Herald, the next one will be tier 2, and so on up to tier 5. After reaching tier 5, every subsequent Herald in that game session stays at tier 5.
A smart strategy with Worldstone Shards — items that terrorize an entire act at once — is to first build up your Herald tier by farming normal Terror Zones. Get to tier 1 or 2 (or higher if you can), and then use the Worldstone Shard to terrorize an act of your choice. This lets you clear that entire act's worth of terrorized content while encountering higher-tier Heralds from the start. Note that as of Season 13, Worldstone Shards can drop anywhere in the game (not just in Terror Zones), and they are tradeable. Whether this is intended or a bug remains unclear at this point.
Builds with fast teleportation frames and high damage output work best for this type of farming. You also need strong defenses because tier 5 Heralds hit very hard.
5. Mephisto (Act 3)
Mephisto sits at the bottom of the Durance of Hate. From the Durance of Hate Level 2 waypoint, navigate through the randomized floor to find the stairs down to Level 3, where Mephisto waits in a fixed arena.
What to farm: Unique and set items. Mephisto has one of the best loot tables for act bosses and ranked in the top 3 for loot value per run in extended testing. He is also farmable in Nightmare difficulty if your character is not yet strong enough for Hell, making him a reliable early-season target.
How to farm: Teleport or run through Durance Level 2 to find the Level 3 entrance. Kill Mephisto, grab drops, and exit. The only slowdown is getting lost on Level 2, which has a confusing layout. With practice (or teleport), this becomes one of the fastest boss runs in the game. Aim for 400–500 Magic Find on your gear to maximize unique drop rates without sacrificing too much damage.
6. Duriel and the Summoner (Act 2)
This is a two-part run. The Summoner is found at the end of one of the four paths in the Arcane Sanctuary, accessible via waypoint. Once you kill the Summoner, you gain access to the Canyon of the Magi and the seven Tombs of Tal Rasha, one of which contains Duriel.
What to farm: Unique and set items from both the Summoner and Duriel. This combined run ranked alongside Mephisto in the top 3 for overall loot value.
How to farm: Teleport through the Arcane Sanctuary's four branching paths until you find the Summoner. Kill him, then identify the correct Tal Rasha tomb. Here is the trick: after killing the Summoner, look at the seven tomb symbols displayed on the mini-panel. The symbol that is missing corresponds to the true tomb. The symbols always appear in the same fixed positions, so once you memorize the layout, you can instantly identify which tomb to enter. Teleport to that tomb, fight through to Duriel, and kill him. This run is recommended primarily for characters with teleportation because the Arcane Sanctuary is extremely spread out.
7. Travincal Council (Act 3)
Travincal is accessed via its own waypoint in Act 3. The Council — a group of superunique Zakarum priests — guards the Compelling Orb at the center of the zone.
What to farm: Gold (guaranteed large quantities), runes (the Council has a notably generous rune drop rate), unique and set items, charms, and rares. Travincal is one of the best sources of mid-to-high runes in the game outside of dedicated high-rune zones.
How to farm: Take the Travincal waypoint and head east toward the Council. Kill the Council members quickly — be careful of their Hydra and Blizzard attacks, which hit hard, especially early in a season. Loot everything, including gold, then town portal out. Use Deckard Cain to identify items for free since Council members frequently apply curses. The gold you accumulate from repeated Travincal runs is also excellent for gambling at Anya or Gheed for skill amulets and other valuable items.
8. The Pit (Act 1)
The Pit is a two-level dungeon found in the Tamoe Highland, accessed by going through the Outer Cloister waypoint and backtracking through the Black Marsh. It is a level 85 area.
What to farm: High runes, unique and set items, and base items. Because it is level 85, champions (level 87) and bosses (level 88) inside can drop nearly every item in the game. This area is particularly popular with Item Find Barbarians who use Find Item (the "horking" skill) on corpses to get double rolls on every pack.
How to farm: Enter the Pit, clear both levels from top to bottom, kill every champion and boss pack you encounter, and loot everything. The monsters here are relatively easy compared to other level 85 zones, making it accessible even with mid-tier gear. There is a 50/50 chance the entrance leads to the Pit versus another sub-area, so you may need to check both cave entrances in the Tamoe Highland.
9. Ancient Tunnels (Act 2)
The Ancient Tunnels are a level 85 dungeon hidden beneath the Lost City. You enter through a trapdoor on the ground — it can take a moment to spot among the Lost City's terrain.
What to farm: High runes, uniques, sets, and bases. The standout feature of this zone is that it has no Cold-immune monsters, making it the single best level 85 area for Cold Sorceresses (Blizzard or Frozen Orb). If you are running a cold build, this is your top priority.
How to farm: Take the Lost City waypoint, find the trapdoor, descend, and clear the entire floor. Kill every elite pack and open any chests or containers you find along the way.
10. Pindleskin (Act 5)
Pindleskin (Pindleskin the Undead) is a superunique monster found just outside the red portal next to Anya in Harrogath. He stands in a small courtyard surrounded by a group of undead minions.
What to farm: Unique and set items. Pindleskin has a very high monster level and can drop nearly everything in the game. He also provides solid experience if you are still leveling. The skeletons around him should not be ignored — they can drop good loot as well.
How to farm: Take Anya's red portal, kill Pindleskin and his minions, pick up drops, and immediately save and exit to repeat. This is one of the fastest runs in the game — under 30 seconds per cycle — and requires no teleportation or special navigation. Stack as much Magic Find as possible for this run since the speed makes even small percentage increases add up over hundreds of attempts.
11. Nihlathak (Act 5)
Nihlathak is found at the end of the Halls of Vaught, accessible through the Halls of Anguish and Halls of Pain in Act 5. He is level 95 and shares the same drop table as Baal, making him one of the most rewarding single targets in the game.
What to farm: Everything Baal can drop, but in a fraction of the time it takes to do a full Baal run. Uniques, sets, high runes, and top-tier bases are all on the table.
How to farm: From the Halls of Pain waypoint, determine which direction to go based on wall placement. If the walls are above (north of) the waypoint, the exit is to the north. If the walls are to the south, the exit is to the south. Once you reach the Halls of Vaught, there are four corridors. Look for red "nodes" or growths along the walls of each corridor — the corridor that has visible red decorations is the one where Nihlathak waits. Check each corridor's entrance briefly; you do not need to go far down a path to spot the red markers. This saves you from clearing dead-end paths. Be warned: Nihlathak uses Corpse Explosion, which can instantly kill under-geared characters. Bring adequate fire resistance and life.
12. Mausoleum (Act 1)
The Mausoleum (and its companion crypt) is found in the Burial Grounds, the same area where Blood Raven spawns in Act 1. Both dungeon entrances are near the graveyard.
What to farm: Uniques, sets, and bases. The Mausoleum is a level 85 area with very easy monsters, making it ideal for characters who have just reached Hell difficulty and are not yet geared for tougher zones.
How to farm: Take the Cold Plains waypoint, head to the Burial Grounds, ignore Blood Raven, and enter both mausoleums one after another. Clear each one completely, then reset. This is the safest level 85 farming option in the game for freshly arrived Hell characters.
13. Act 3 Temples and Sewers
Several temples in Act 3 function as high-level zones worth farming. Some are scattered around Upper Kurast and require a bit of searching, while two temples between Kurast and Travincal are always in fixed locations, making them easy to access repeatedly. The Kurast Sewers, also in Act 3, are another high-level zone in the same vicinity.
What to farm: High runes, uniques, sets, and bases. The combination of multiple temples and the sewers in a single connected area creates a dense cluster of farmable content.
How to farm: Take the Upper Kurast waypoint, clear the temples you can find nearby, then clear the sewers. Move toward Travincal and hit the two fixed temples along the way. Because these zones are all close together, you can chain them into a single extended farming session without spending much time traveling.
14. Countess (Act 1)
The Countess is found at the bottom of the Forgotten Tower in the Black Marsh. She occupies the fifth and final level of the tower.
What to farm: Runes. The Countess has a special rune drop table that guarantees rune drops on kill. In Hell difficulty, she can drop runes up to Gul and Lo, though anything above Ist requires significant luck over hundreds of runs. For mid-tier runes (Hel through Ist), she is the most reliable source in the game. She does not have strong unique or set item drops.
How to farm: Take the Black Marsh waypoint, find the Forgotten Tower entrance, and descend all five levels to the Countess. Kill her, grab the runes, and reset. Note that the Countess is immune to Cold, so Cold Sorceresses will need to rely on their mercenary or a secondary damage source to kill her.
15. Eldritch and Shenk (Act 5)
Eldritch the Rectifier is a superunique demon found just north of the Frigid Highlands waypoint. Shenk the Overseer is located south of the same waypoint, down the hill toward the Bloody Foothills.
What to farm: Uniques, runes, bases, and experience. Both are quick kills with decent drop tables. The area between and around them often spawns additional champion and elite packs, adding extra loot opportunities.
How to farm: Take the Frigid Highlands waypoint, go north to kill Eldritch and any champion packs nearby, then head south to kill Shenk. When Shenk dies, some of the minions bound to him die instantly as well, saving time. Check the corners and alcoves near Shenk's area for additional elite packs and chests. A Hel rune or better can easily appear from the extra packs in this zone.
16. Andariel (Act 1)
Andariel is the Act 1 boss, found at the bottom of the Catacombs beneath the Monastery. Take the Catacombs Level 2 waypoint and descend to Level 4 where she waits.
What to farm: Unique and set items. Andariel is also the best source for Stones of Jordan when farmed in Nightmare difficulty, which makes her relevant even outside of Hell. In Hell, she is a solid but not top-tier boss for general unique farming.
How to farm: Teleport or run straight through Catacombs Levels 3 and 4 to reach Andariel. Kill her, grab the drops, and reset. This is a short run and works well as part of a larger route rather than as a standalone farm.
17. Baal (Act 5)
Baal is at the end of the Worldstone Keep, accessed through the Worldstone Keep Level 2 waypoint. You must clear five waves of minions in the Throne of Destruction before Baal opens the Worldstone Chamber portal.
What to farm: The best uniques and set items in the game, plus strong experience for characters still leveling. Baal's drop table is among the best of any boss.
How to farm: Descend through the Worldstone Keep to the Throne of Destruction, clear all five waves, then enter the portal and kill Baal. The problem is that this run is very long — often several minutes even with a well-geared character — because of the mandatory wave-clearing phase. Unless you specifically need experience or are doing this as part of a multiplayer split, other bosses offer better loot per minute.
18. Act 5 Red Portal Zones
Several sub-zones in Act 5 — found inside red portals in areas like the Glacial Trail, Frozen Tundra, and Arreat Plateau — function as high-level instances.
What to farm: Runes, uniques, and bases. These zones become more interesting when a Terror Zone lands on them, boosting their monster levels further.
How to farm: Enter the red portals you find in these Act 5 areas, clear the sub-zone, and loot. These are generally less efficient than the Act 1–3 farming zones listed above, but they are worth running when terrorized.
D2R 3.0 Best Farming Routes in Region of the Warlock & Season 13
A farming route chains multiple spots together in a single game so you spend less time in menus and more time killing. Below are the main routes that work well in Season 13, organized by situation and build type.
Cold Build Route (Blizzard / Frozen Orb Sorceress)
This route avoids zones with Cold-immune monsters so you can clear everything at full speed without relying on your mercenary. Start at the Mausoleum in the Burial Grounds (Act 1), clear both crypts, then move to the Stony Tomb in the Far Oasis (Act 2). After that, head to the Ancient Tunnels beneath the Lost City — this is your highest-value zone on the route since it is level 85 with zero Cold immunes. Next, teleport to Travincal (Act 3) and kill the Council. Then drop down to the Durance of Hate and kill Mephisto. Finish the route by going to Act 5 and killing Pindleskin. Save, exit, and repeat.
The full sequence is: Mausoleum → Stony Tomb → Ancient Tunnels → Travincal → Mephisto → Pindleskin.
Fire Build Route (Fire Sorceress / Fire Druid / Fire Demonist)
Fire builds have a slightly different set of zones open to them. Start at the Mausoleum (Act 1), then run the Countess in the Forgotten Tower — the Countess is not Fire-immune, so she goes down quickly and gives you guaranteed rune drops. Next, head to the Stony Tomb in Act 2, then to the Sewers beneath Upper Kurast (Act 3), which have no Fire-immune enemies. Move to Travincal for the Council kill, then Mephisto in the Durance of Hate, and finish with Pindleskin in Act 5.
The full sequence is: Mausoleum → Countess → Stony Tomb → Sewers → Travincal → Mephisto → Pindleskin.
Beginner Route (No Enigma / No Teleport)
If you do not have an Enigma runeword or any other source of Teleport, you need a route that does not rely on crossing large zones quickly. This route was designed for characters who just reached Hell and have modest gear.
Start by killing Pindleskin in Act 5 — take Anya's portal, kill him and his skeletons, and loot. Then go to the Inner Cloister in Act 1, a small room that can spawn multiple elite packs including the superunique Bone Ash. Kill everything in there and check all chests and caskets for gems and other drops. Next, head to Travincal in Act 3 and kill the Council for gold, runes, and items. Finally, go to the Frigid Highlands waypoint in Act 5 and kill Eldritch (north of the waypoint), then sweep south to kill Shenk the Overseer. Check the corners and alcoves around Shenk's area for extra champion packs — there are often several.
The full sequence is: Pindleskin → Inner Cloister → Travincal → Eldritch → Shenk.
After each full loop, save, exit, and re-enter. Use the gold you accumulate to gamble for amulets (which can roll +skills and sell to other players for runes) and other useful items. This route requires no Teleport, covers multiple acts, and can be completed in just a few minutes per cycle.
Chaos Sanctuary + Cow Level Route (High-Gear Characters)
Once your character is fully built, the two highest-value zones in the game per hour are the Chaos Sanctuary and the Cow Level. Run the Chaos Sanctuary first — open all three Seals, kill the Seal bosses and Diablo, and clear as many packs as time allows. Then create a Cow Level portal and full-clear the cows for high runes and bases. This two-zone route gives you the best mix of unique items, set items, high runes, and runeword bases in the game.
Terror Zone + Herald Route (ROTW-Specific)
This route is built around the new Region of the Warlock mechanics. Check which Terror Zone is currently active. If it covers an act boss, farm that boss repeatedly for Statues and top-tier item drops. If no act boss is terrorized, enter the active Terror Zone and kill every elite pack, champion group, and superunique you can find to trigger Herald of Terror spawns. Each Herald kill raises your Herald tier for that game session, and higher tiers drop better loot including the Latent Sunder Charms.
When you have a Worldstone Shard, do not use it immediately. Instead, farm normal Terror Zones first until you have raised your Herald tier to at least 1 or 2 (ideally higher). Then use the Shard to terrorize an entire act of your choosing and clear that act from end to end. This way, every Herald that appears during your shard-terrorized session starts at your elevated tier, giving you much better loot from each one. Builds with fast Teleport frames, high damage, and strong defenses perform best here because tier 5 Heralds are genuinely dangerous.
Split Farming Route (Multiplayer)
Split farming is the most efficient farming method in D2R once all participants have strong enough characters to solo their assigned zones. In a multiplayer game, each player takes a different farming zone from the list above — one person does Andariel, another does Mephisto, a third does Diablo, a fourth clears the Pit, and so on. Everyone farms their zone simultaneously, and once all zones are done, the game resets.
The reason this works so well is that D2R increases drop rates based on the number of players in the game, even if those players are in completely different areas. The drop bonus scales at odd-numbered thresholds: 1 player and 2 players give the same drops, 3 and 4 give the same (higher) drops, 5 and 6 give the same (even higher) drops, and 7 and 8 give the same (maximum) drops. This means you should aim for an odd number of players in the game — 3, 5, or 7 — to get the best value without wasting a slot.
Keep in mind that monster difficulty also scales with player count. Do not jump into a 7-player split farm if you are freshly geared. Start with 3-player games, move to 5 when comfortable, and only attempt 7 when every member of the group is well-equipped. When joining an existing split game, ask which zones are still available before heading out so you do not duplicate someone else's run.
Best Magic Find Rate For Farming
Across all of these routes, if your goal is uniques and set items, aim for 400 to 500 Magic Find on your gear. The unique item drop curve starts to flatten sharply above 500 MF — for example, 500 MF gives you roughly 150% increased unique drop chance, while going to 700 or 800 MF adds only a marginal further increase while severely cutting into your damage and clear speed. Below 400 MF, you are leaving noticeable value on the table. If your gear is so strong that you can maintain 500 MF and still one-shot most packs, keep it. Otherwise, trade MF for damage — faster kills over more runs will outperform slow kills with inflated Magic Find.
Note that Magic Find does not affect rune drops at all. If you are specifically farming high runes (Ber, Jah, Zod), your focus should be on kill speed and monster density, not Magic Find.