This guide will introduce one of the best Paladin builds for Diablo 2 Resurrected Ladder Season 14 Reign of the Warlock (RotW).

D2R Season 14 RotW Content & Main Changes (Patch 3.2)
D2R Ladder Season 14 officially launches on May 22/23, 2026, across global regions, bringing the full Reign of the Warlock content and major Patch 3.2 balance updates. This season introduces massive quality-of-life improvements, Terror Zone overhauls, new endgame items, class balance tweaks, and core mechanic adjustments.
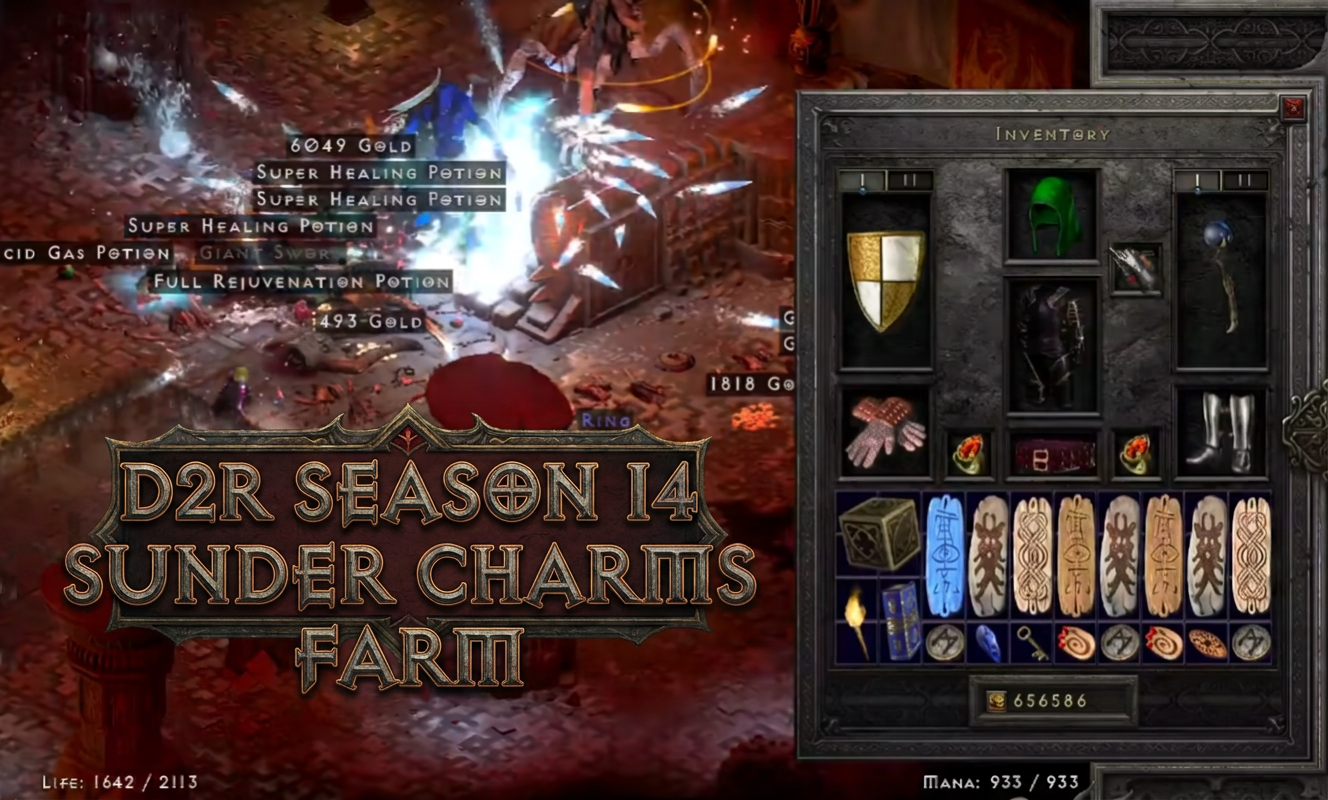
Herald & Sunder Charm Rework: Herald bosses now spawn more consistently in Terror Zones with a 5-second lightning storm warning before appearance. Tiered Herald difficulty is heavily nerfed (health bonus per tier reduced from 500% to 250%, damage bonus from 50% to 250%). Latent Sunder Charms now drop from all monster types (Terrorized and non-Terrorized) with magic find, and solo players gain improved drop rates for Worldstone Shards and Sunder Charms.
Terror Zone Upgrades: Worldstone Shards can now terrorize entire acts, making Herald farming and key running far more efficient. Tier 3-5 Heralds receive boosted Sunder Charm drop chances, rewarding high-tier endgame farming.
Quality of Life Updates: Bindable WASD keyboard movement returns, stash and controller UI bugs are fixed, and Chronicle reward glitches are resolved for smoother endgame progression.
Warlock Nerfs: Heavy damage reductions to Miasma Bolt, Flame Wave, and Chaos skills weaken the new Warlock class, making reliable melee/caster builds like FoH Paladin more competitive in Season 14’s meta.
Colossal Ancient Buffs: Colossal Ancients gain higher magic resistance and improved damage, raising endgame Uber difficulty for unprepared builds.
D2R Ladder Season 14 RotW Best Paladin Build
The Feast of Heavens Paladin is the best all-around Paladin build for D2R Season 14 RotW. It combines fast full-screen clearing, strong single-target boss damage, max resistances, max block, and great magic find potential without sacrificing offensive power. Unlike Hammerdin, it needs no precise positioning, making it extremely beginner-friendly while still dominating endgame content, Terror Zones, and chaos runs. This build is a pure magic damage FoH setup, completely ignoring lightning damage modifiers to avoid weak hybrid scaling. Its biggest advantages include effortless screen-wide enemy targeting, piercing Holy Bolt projectiles that hit multiple enemies, zero magic immunity issues in key farming zones, and consistent sustain for solo and party play. It outperforms most builds in speedrunning Terror Zones, Chaos Sanctuary, Forgotten Tower, and Tomb farming.
Skill Point Allocation
All skill points are invested to maximize magic damage output and defensive consistency, with zero wasted points on useless lightning-focused synergies.
Max Feast of Heavens (Primary Damage Skill): Fully max this skill first. It is your main screen-clearing ability that releases spreading holy bolts to eliminate crowds of enemies across the entire screen with minimal aiming.
Max Holy Bolt (Synergy & Single-Target Damage): Holy Bolt serves two critical roles. It provides massive magic damage synergy for FoH, and acts as your primary single-target skill for bosses, unique monsters, and elite packs. Since we focus purely on magic damage, Holy Bolt replaces all single-target lightning damage needs.
Zero Points in Holy Shock: Holy Shock only boosts FoH’s useless lightning damage component. Investing points here creates an ineffective hybrid build that reduces overall magic damage without adding meaningful versatility.
Max Holy Shield (Core Defensive Skill): With leftover skill points, Holy Shield is a top priority. It is one of the strongest defensive skills in D2R, granting max block chance, improved defense, and drastically higher survivability for high-density endgame zones.
Remaining Points: All extra points go to further boost Holy Bolt synergy to scale single-target boss damage.
Aura Setup
Meditation Aura: The best choice for this FoH build. Many players mistakenly see it as a wasted aura pick, but FoH has extremely high mana consumption during continuous clearing. Meditation provides unlimited mana sustain while synergizing with Prayer to deliver consistent, steady health regeneration. This sustain is reliable in all scenarios, including boss fights, wave events, and long Terror Zone runs.
Redemption Aura: It works well with minimal skill points but has major flaws for Season 14 ladder play. It only triggers on enemy corpses, making it useless during boss fights or sparse enemy encounters. In online party games, it interferes with necromancer corpse skills, barbarian Find Item, and RIP modifier gear. Additionally, Redemption only benefits the Paladin, offering zero sustain for mercenaries or teammates. Only use Redemption if you have severely limited skill points.
Endgame Gear Setup
Body Armor: Enigma. Still the undisputed best-in-slot choice. No new RotW armor can replace Enigma’s teleport mobility and utility. Teleport allows instant repositioning, drastically speeding up high-density zone clearing and making overall gameplay far smoother.
Weapon: Heart of the Oak (HotO) (Reverted from Void Rune Word). We tested the new Void runeword for its 14% magic damage boost, which was supposed to add 1000 Holy Bolt damage. However, the loss of +1 all skills reduced FoH damage by nearly 200, overriding the magic damage gain. Further testing confirmed the critical issue: FoH’s holy bolts do not scale with generic magic damage increase modifiers. Void’s core bonus is completely useless for this build, making HotO mandatory for maximum skill levels and consistent damage.
Helm: Hellwarden's Will + New Magic Jewel. Replaces the traditional Shako for Season 14. The helm grants 20% FCR to unlock new gearing paths. While the new magic jewel only provides minor direct damage and costs skill points (losing ~200 FoH damage), its enemy magic resistance reduction delivers better real-world damage output. This helm also lets us drop Spirit shield and equip Herald of Zakarum for massive Paladin skill bonuses.
Shield: Herald of Zakarum. Becomes core in Season 14. FoH Paladin heavily relies on maxed skill levels, and this shield grants +4 main skill points plus exclusive Paladin bonuses that far outperform Spirit shield’s generic stats.
Rings: Dual Sling Rings (Replace Stone of Jordan). Provides 20% critical FCR to hit the 125 FCR breakpoint, plus -10 enemy magic resistance per ring to stack defensive penetration.
Belt: Gheed's Wager (Replace Arachnid Mesh). Focuses on stacking enemy magic resistance reduction while retaining strong standalone defensive and utility bonuses for endgame consistency.
Gloves: Trang-Oul’s Claws or Magefists. Both grant a mandatory 20% FCR. Choose Trang-Oul’s for extra cold resistance to cover elemental weakness gaps, or Magefists for faster cast speed consistency.
Amulet: +2 Paladin Skills FCR Amulet. New RotW amulets slightly boost Holy Bolt damage but severely nerf FoH overall. The classic +2 Paladin skill FCR amulet remains superior. Note: Belt and amulet are your only variable FCR sources, so always verify you hit the 125 FCR breakpoint.
Boots: Flexible Pick. Horazon's counters magic penalty from seasonal charms, while War Traveler is the best swap option for extra magic find during farming runs.
Charms
Full set of Paladin Combat Skill Grand Charms for maximum skill scaling
Hellfire Torch + Annihilus unique charm (mandatory endgame stats)
Small charms to fill resistance gaps and boost magic find
Mercenary Setup
Best Merc: Act 2 Holy Freeze Mercenary
This setup outperforms the traditional Act 2 Prayer mercenary. Prayer aura has no diminishing returns, and your Paladin’s Meditation + Prayer synergy provides far stronger healing than any mercenary can offer. Holy Freeze mercenary delivers powerful enemy-slowing effects that drastically boost survivability in Chaos Sanctuary and wave events.
Mercenary Gear
Weapon: Reaper’s Toll. Applies Decrepify curse to slow enemies, reduce enemy physical resistance, and trigger consistent crowd control
Helm: Cure. Provides 39% reduced curse duration, essential for surviving Chaos Sanctuary and seasonal wave events
Armor: Treachery. Boosts mercenary attack speed for more frequent Decrepify procs and improved life leech for self-sustain
D2R Paladin Ladder S14 Start Guide & Leveling
FoH Paladin is weak at early levels, so we use a standard Holy Fire + Zeal leveling build until level 75, then respec into the endgame FoH setup. This step-by-step guide ensures fast, smooth ladder progression for solo and group play.
Normal Difficulty (1–18)
Main skills: Holy Fire (clearing) + Zeal (single-target damage)
Early runewords: Stealth (Tal + Eth) for mobility and defenses, Steel runeword in a basic scimitar for Zeal damage
Farm Normal Countess consistently for early rune drops to craft starter gear
Normal – Nightmare Transition (18–40)
At level 18, switch to Blessed Hammer leveling (far faster progression)
Kill Normal Baal, farm Normal Cows for a white 4-socket Crystal Sword (use Act 5 socket quest)
Farm Nightmare Countess for Tal and Am runes to craft your first Spirit sword
Craft Lore Helm with Soul runes for extra skill points
Optional: Act 1 Freezing Arrow mercenary with Insight bow for mana sustain
Nightmare – Hell Difficulty (40–75)
Continue Blessed Hammer progression through all Nightmare and Hell content
Farm Hell Cows for a high-res white Paladin shield, craft a second Spirit shield with Act 5 socket quest
Buy a teleport staff from Act 2 Nightmare Drognan for temporary mobility before Enigma
Join public Hell Chaos runs to reach level 75 quickly
Level 75 Respec & Early Endgame
At level 75, fully respec into the Feast of Heavens build. With dual Spirit gear, Lore Helm, and maxed resistances, you can efficiently farm Chaos Sanctuary, Forgotten Tower, Arcane Sanctuary, and other FoH-friendly Terror Zones from day one of the ladder.
Group Play Leveling Tip (8-Player Games)
In full party ladder runs, assign three Paladins different auras for maximum efficiency: Concentration, Conviction, and Salvation. This aura combination makes group farming drastically faster and safer for all teammates.